The aim of this guide is to help you understand benefits of having Bing Webmaster Tools set up and to show you exactly how to do it.
This tool is very similar to Google Webmaster Tools. Its purpose is to help you understand how Bing sees your site.
You can find great insight there and get better understanding on your site’s performance and ranking. There are reports about indexed pages, search queries, backlinks, errors, etc.

Let’s go through the steps together.
Step 1: Create Bing Webmaster Tools Account
Some of you are already using Hotmail or Outlook.com account so you have a Microsoft account ready. You can use that to create BWT account.
If you don’t have an account already, you can just create it as the part of the Webmaster Tools sign-up process.
Go to Bing Webmaster Tools sign-up page. Click “Sign in” if you already have a Microsoft account.
Click “Sign up with Microsoft account” if you don’t have an account already. Follow the instructions to create the account.

Step 2: Add Your Website
After you created the account, you need to log in and add your site to Bing Webmaster Tools. Find the “Add a Site” text box, type in your site’s URL and click “ADD” button.
Another method is to click on “ADD YOUR SITE” button below and you will do the same on the next page.

You will need to fill in the form on the next page. Some fields are not required and you can fill them later. After you are finished click on “SAVE”.
Step 3: Verify Website Ownership

By creating an account on Bing Webmaster Tools you are basically requiring a lot of additional information on the site you typed in. Bing has an additional layer of security.
You have to verify that you really have an ownership of the site.
There are 3 verification methods you can choose from. Your preferred method will depend on the site’s implementation or your specific knowledge.
We will explain each method so you can decide which one to use:
Method 1: Add XML File To Your Site
This is a very simple method where you just download a file from Bing and place it in your root folder on your site. After that, you just have to visit that file on your server and your verification will be valid.
Download the file from the option 1 and follow the instructions.

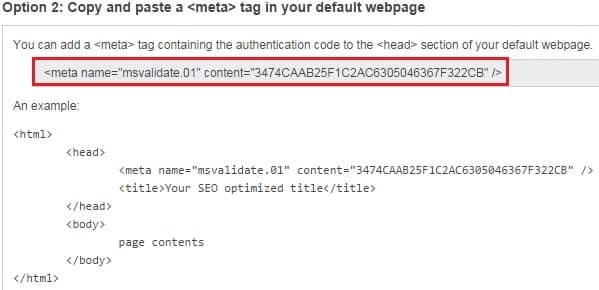
Method 2: Add Meta Tag
This is another very simple method. You will get a code snippet and you have to paste it on your home page.
The code need to be placed in <head> section.

Method 3: Add CName Record To DNS
This is slightly more complicated method, but you may prefer it anyway. You will have to log into your domain name provider and update some configuration files.
On this screen, choose your domain name provider and Bing will give you a list of results with the process of how to do it for that specific provider.

If you cannot verify your site right away, you can later log into your BWT, click “Verify now”, and choose the method you’ve been working on to finish verification process.

Now that you have everything set up, your reports will start showing data and you can start getting some good insights from them.
Final checklist
To give you a short summary of everything we explained in this guide, here is a short checklist to put everything in perspective:
- Create Bing Webmaster Tools account
- Add your website
- Verify website ownership
You need this how-to guide to unlock powerful reporting from Bing Webmaster Tools reports. It will show you how to set it up and start getting excellent insights into your site’s performance on Bing.
Photo by nensuria / CC BY

