The aim of this guide is to help project managers or merchants manage and delegate tasks to team members through the efficient use of Basecamp.
Basecamp is an easy favorite because of its simplicity and reliability. It allows you to keep communication, instructions, and files pertaining to a project or task all in one place.
We use Basecamp not because we think it’s the best project management tool available, but because it’s the best project management tool for EMPLOYEES.
Other project management tools either have an large number of complex features perfect for planning every tiny detail, or they are tightly focused tools for very small teams or individuals.
As you may know, we are huge fans of Basecamp here because a) it’s what we use; and b) it’s really awesome. By awesome I mean: It’s easy to use, easy to learn, and easy to navigate. Project managers will find the system and its inner workings painless to introduce to newbies.
Before we get started, let’s make sure that Basecamp is the one for you. There are other great task management websites out there as listed on this guide: How to Manage Employees with Simple Systems.
The guide includes a brief walk-through of Basecamp and other task management sites such as Trello and Teamwork. Feel free to click through to see which floats your boat.
You’re back? Great! Now let’s get the show started.
Step 1: Setup A Basecamp Account
Go to Basecamp and set up an account. Just follow the link, fill out the form. If at this point you are still unsure, Basecamp offers a free two-month trial.
Step 2: Invite People
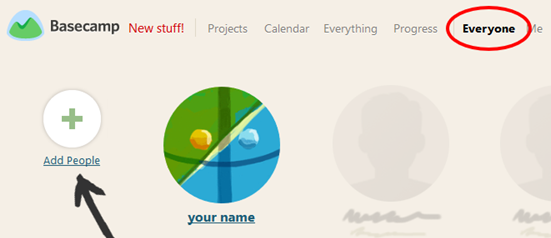
Now it’s time for your team members to join in. Add them to the project by clicking on Everyone then Add People. Type in their email addresses and you’re done.
Step 3: Create A Project
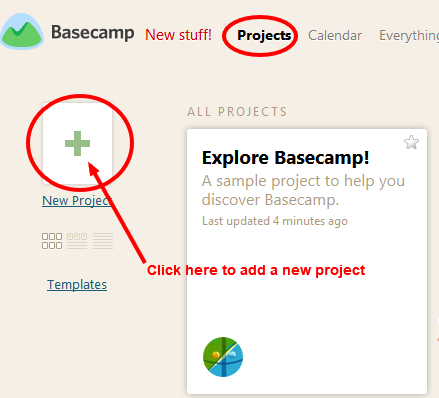
Click on Projects to be taken to the project page.
Once you are there, click on the New Project button on the left side. Then invite new people to this project.
The next thing Basecamp will ask you to do is to pick a template. We strongly suggest using a blank template so you can customise it according to your preferences.
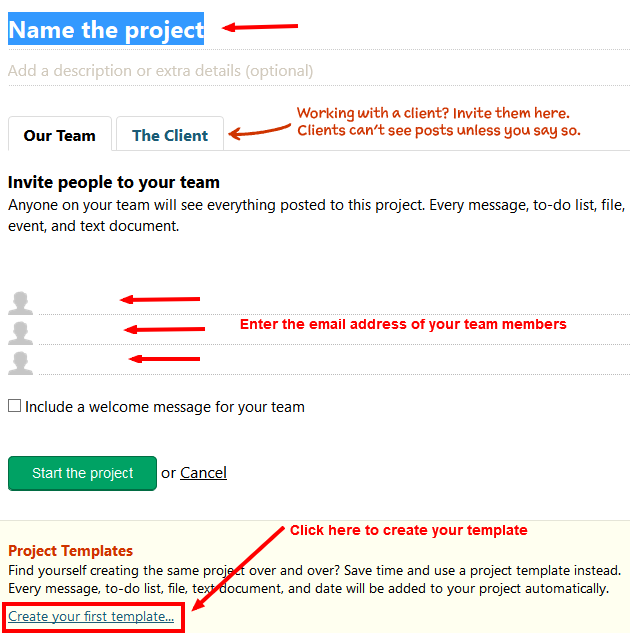
Now that’s done, you finally get to name your project. For better organisation, name the project after your company or the particular website that you are working on.
Do not confuse this with the specific tasks – that comes a bit later.
Step 4: Create A To-do List
If you love checklists, this is where the fun starts. The To-do list is a list of the specific tasks that you will later assign to different members of your team.
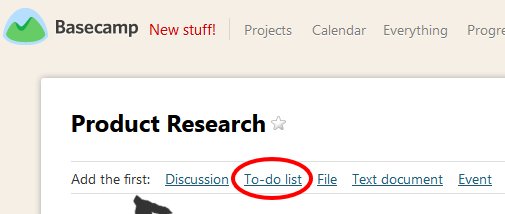
Click on Add a to-do list. A blank fill-in space will appear which instructs you to give the list a title. Name the list accordingly. Think of the major things that need to be done for the project such as content creation, email marketing, and such. Save and start adding to-dos.
Step 5: Add To-Dos
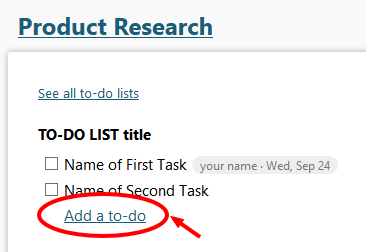
We finally get to nitty-gritty of things! The to-dos are the specific tasks that will be assigned to a particular person. Create a task by clicking on Add a to-do. Be specific as possible when creating a title for the task.
For example, you can create tasks such as Rewrite About page or Write product description for premium line under the Content Creation to-do list.
Step 6: Write Task Details
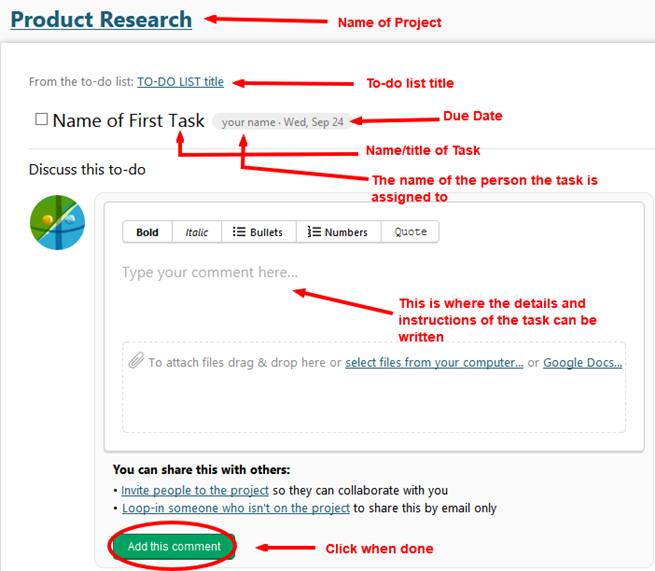
Click on the task you just created to add details and instructions. Don’t just stop there, add links, images, and other files that you believe will help get your point across.
This would be the beginning of a thread where communication and file exchange related to the task, until it reaches completion, will take place.
Step 7: Assign The Task
With the details and instructions complete, you are now ready to assign the task to a member of your team.
You can accomplish this by clicking on the gray oval link beside the to-do title that says Unassigned No Due Date.
A small window containing a drop-down list of your team members’ names and a calendar will pop out.
Click on the team member the task will be assigned to and set a due date. Your team member will be notified about his or her new task via email.
This assigned task will automatically show up on his or her to-do list.
Step 8: Share Files
As we have pointed out earlier in Step 6, you can share files with members that you are working on. If you are on a to-do thread, all you have to do is drag and drop files to the comment window, or upload files from your computer, and hit send.
How It Looks Like
Step 9: Check Progress
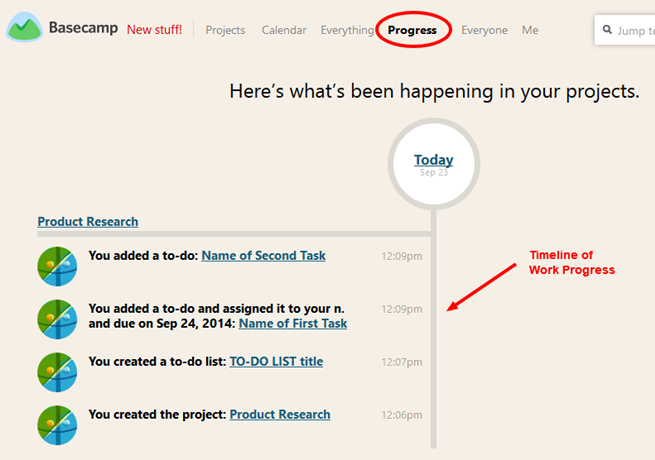
A million times better than designating work via email, Basecamp will give you a bird’s eye view of the entire project. At a glance you will be able to see who’s working on what, what’s getting done when, and if deadlines are met.
There would be no need for you to open multiple emails just to keep up with everyone. View everything that’s going on in a neat timeline by clicking on Progress.
You can also view which tasks are due for which day by viewing the Calendar. All dated tasks are automatically added to the Calendar for convenience.
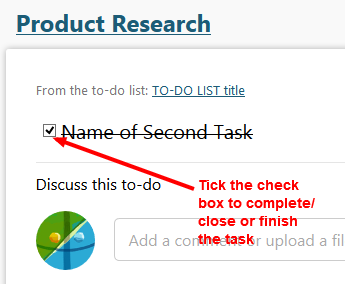
Step 10: Cross Out Finished Tasks
This has to be the most satisfying part of working on Basecamp. Much like an old-fashioned list, you can tick off or cross out finished tasks, giving everyone working on the project a great sense of accomplishment.
One Last Note On Basecamp
Because Basecamp keeps a history of all the work done for a particular task, including files shared, it makes it easy to keep newcomers to the project up to speed.
Plus, it comes with a search function that enables its users to zoom in on topics they need to learn about.
With everything properly documented, Basecamp makes a fantastic learning tool for freshly-minted members of the team, and makes reassigning tasks less stressful.
Final Checklist
To ensure that you are utilising Basecamp to its full capacity, make sure to:
- Name projects, to-do lists, and tasks accordingly
- Add all the members of your team to the project
- Include as much details and instructions to the tasks
- Set a due date
- Share files necessary for project completion
- View the day’s progress on the timeline
- Keep track of due dates on the calendar


