To make our web pages interesting for readers, it is ideal to include relevant photo/image. Sometimes we create blog posts with lots of texts and will appear boring to the readers. So it would be nicer to break up these texts with an image.
It will attract more readers and will help convey the message of the article. You can add the image either at the beginning, in the middle or at the bottom of your blog post.
A How-To Guide without images is boring. Consider this article without images – StartupBros.
Each How-To Guide not only needs screenshots that describe the process, but also interesting header images. The header images set the concept for the article.
Step 1: Find Images
To find an image, we can either use Flickr or Creative Commons.
Flickr
1. To search Flickr for “free” (http://creativecommons.org/publicdomain/zero/1.0/) images you can use this search string: http://www.flickr.com/search/?q=joy&l=commderiv&s=int
- Use %20 to replace the spacebar if you have two words. Eg: hot sun = hot%20sun
- “commderiv” means that it has a ‘free to use’ type Creative Commons license.
- “int” means that the most interesting images are pushed to the top of the results. “interesting” is based on the number of comments and likes that an image receives in the Flickr system.

2. Sometimes the “commderiv” and “int” pieces will disappear from the search string. This happens naturally when you click around in the Flickr website. So, when you do a search just make sure that you are in fact looking at “commderiv” and “int” search results.
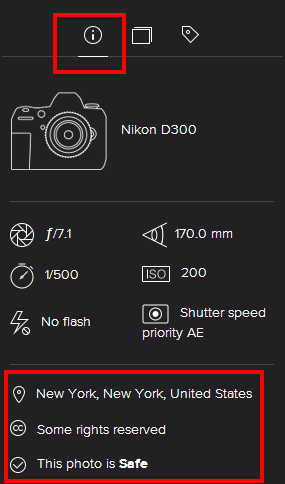
3. When you’ve decided an image to use, it must be clear that the image is licensed for use in commercial enterprise. You will see the license in the bottom right corner of the screen.
Creative Commons
Another way to search for images for our web pages is to access CreativeCommons. This is another way the to look for images that are free for us to use. We can also find images with licensed that we can effectively use for our posts.
Step 2: Choose A Good Image
Choosing a good image is very important in eCommerce stores. We need to use the right image to make sure that the concept will not appear confusing and annoying. These will carry the message that you want readers to acquire.
On blog posts, we’re going to use images that are connected or related to the idea that we’re creating on the blog post.
To decide if the image is a good one to be used on the blog post, you will need to take note of these considerations:
Content
- Positive images work better than negative images. For example, an image of a happy person with a solution is better than a sad person with a problem.
- Single concept per image. The photo will have the subject matter in focus. It will have one idea.
- The idea of the image that you should use must be related to the topic.
- The image provides a clear presentation of ideas that readers can easily catch or perceive.
- Choose an image that tells a story, an image that speaks to you.
Quality
- Use images with the correct set of colors to create a physical and emotional reaction to the readers. Colors too are essential to delivering the actual message to the readers.
- Make sure to match the image with the page color background and texts and that it does not clash with other colors on the page.
- Choose an image that doesn’t have distracting clutter, unintentional fuzziness or anything that creeps in the edges of the frame.
- An image that sets a good mood, this will affect how viewers react to the page, like if they will feel relaxed, or at peace, excitement, fun, or intense action.
- Avoid images that don’t have a good balance like those overexposed or underexposed or those that have extreme shadows, they don’t look good on pages.
- Avoid images that are blurry, this will lose the details of the image.
- Do basic photo editing to clean up unnecessary white lines or red eyes.
Format
- Focus on horizontal images, not vertical. Most blog posts have a column format and need a header image at the top of the post. A vertically oriented image is harder to fit into a blog post format.
- You can use JPEG for photos, PNG for images with graphics or GIF (if an animation is necessary).
- Use images in uniform size, uniformity connotes professionalism.
Special Consideration on Choosing Good “Product” Images
- Use a number of images that shows different angles of the product.
- Create a good and effective context on how the product is to be presented to potential buyers.
- Include a zoom option so viewers can see the product up close.
- If sizes and colors are available, make sure to include these images to offer product variations.
- Consider consistency in the background to highlight the products.
Special Consideration in Choosing Good “Service” Images
- Use images that capture the action, like sewing clothes, fixing cars, caring for the sick.
- You can also use images that present the result, like a well-decorated wedding reception, creative cakes, or a unique hairstyle.
- You can also use a photo of yourself doing your business.
Examples of Images with Good Content
Image for the article “Being a Successful Freelancer while working with a remote team”

This image connotes a happy and relaxed person working remotely. It gives a positive feeling that might draw people in considering working remotely instead of the usual office.

Examples of Images with Bad Content
Image for the article “Being a Successful Freelancer while working with a remote team”

This image only shows a picture of a laptop without details on how it relates to the topic. It doesn’t present a clear idea of the message that it’s trying to relay.

This image is not really related to the topic as it has a kid over a laptop. It doesn’t have good content and might confuse readers.
Images with Quality Comparison
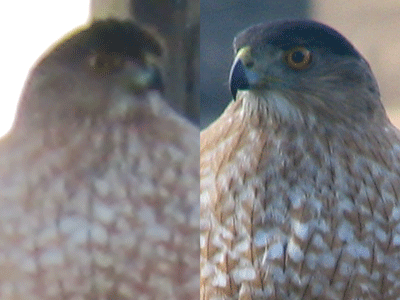
A visible difference in balance and details. Notice the better sharpness of the right image and the blur and pixelated left image.

This image has different moods, background and color. You can select images with moods depending on the content and message of your blog post.
Images with a Good Format
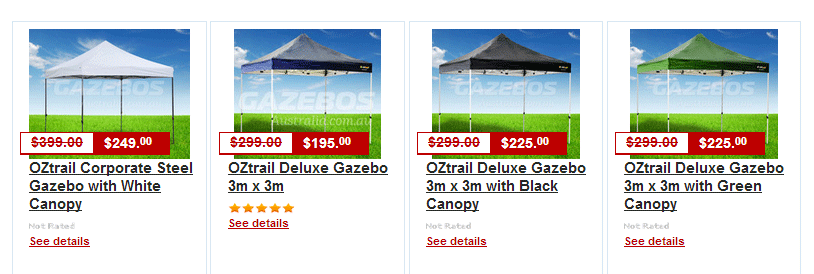
This page is using good product background as they are consistent with other product backgrounds. The sizes and formatting are uniform.
Step 3: Save and Format The Image
1. Click on the image that you want to use. This will open it up into a larger window view.
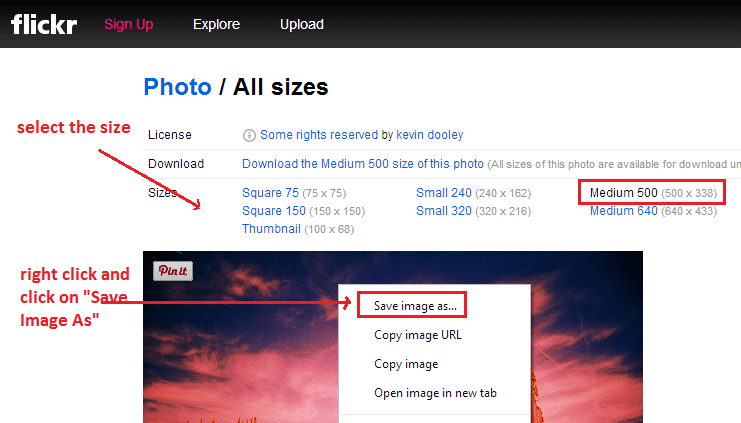
2. There is a small “More Options” icon of three dots to the right of the image. You may need to scroll down. After clicking the More Options icon, click on “Dowonload/All Sizes” option. This will bring you to a different page with more information about the license and the sizes that you want to download.

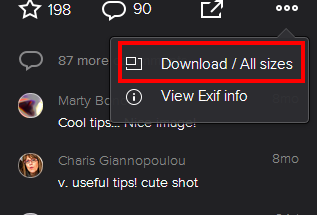
3. When you have chosen the size you want, right click on the image and click on “Save Image As” Save the image around the 500 pixels wide. This will be wide enough for most blog uses.
