The aim of this guide is to teach you how to set up your store’s Twitter account in 10 easy steps, so you can start tweeting in no time.
You need to know this guide because Twitter is a social networking channel you can use to get more potential customers.
Social engagement is essential for any eCommerce store owner. The more social networks you use, the higher the possibilities of gaining new leads that can eventually turn into paying customers.
If you haven’t setup a Twitter account for your store, this guide will walk you through so you can have an account up and running in a matter of minutes.
Step 1: Go To http://twitter.com/signup
The link above will send you directly to Twitter’s sign up page.
Step 2: Input Your Details On The Sign Up Page
You need to input your full name, email address, password and username.
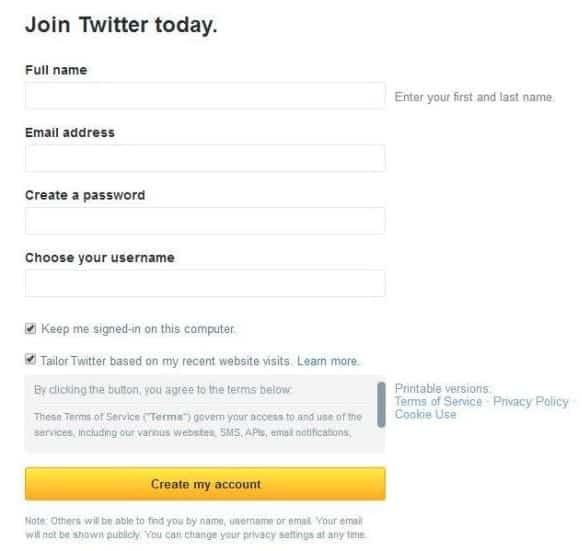
Step 3: Click ‘Create my account’
Click the yellow ‘Create my account’ button after you’ve entered the necessary details. This step will take you to a 5-page Getting Started series.
Step 4: Confirm And Activate Your Account
Twitter will send you a confirmation email on the address you used in creating your account.
Click on the link within the body of the email or copy-paste it onto a web browser bar to activate the account.
Step 5: Follow The Prompts On The Getting Started Series
Click on ‘Let’s go!’ on page 1 of 5
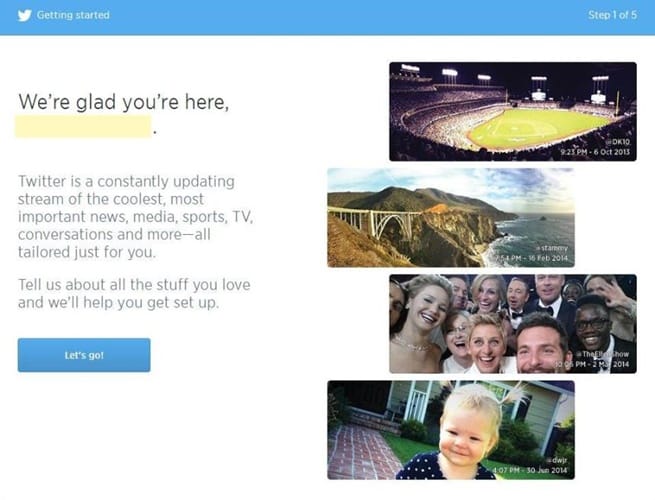
- Tick the boxes of the ‘interests’ that apply to you on page 2 of 5

- Click ‘Continue’ once you’re done
- You can follow all of the suggestions on page 3 of 5. But you can pick only the most relevant by clicking on the ” X ” buttons at the right side of each suggestion.

- Click ‘Follow & continue’ when you’re done.
- Click ‘Upload your (email) contacts’ either from the email you used in signing up or from a different email service.
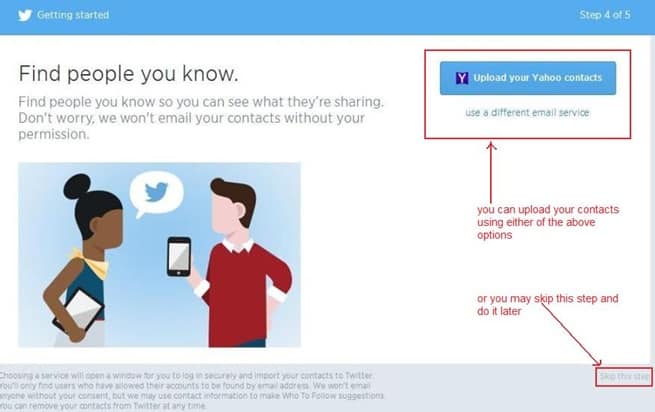
- If you chose ‘Skip this step’ on the previous page, you will be presented with email service buttons on page 5 of 5.
- You can either go directly to your Twitter timeline by clicking ‘Continue’ or stay on this page to add people via email provider.

You will be taken to your Twitter timeline which looks like the one below. The next steps will be adding a profile photo and a header.
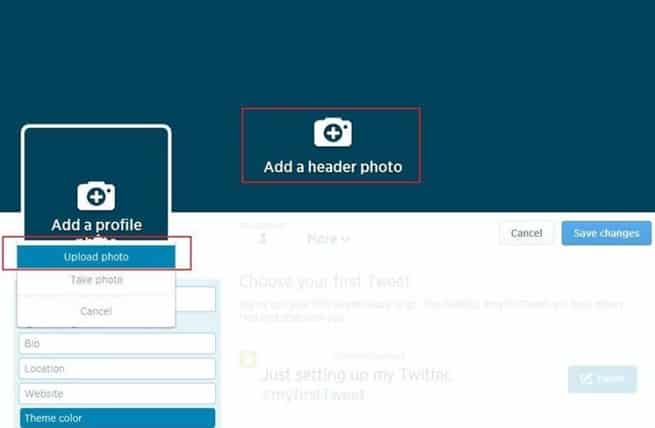
Step 6: Add Your Profile Photo
Since your Twitter account is for your eCommerce store, it is best to use your store’s logo as profile photo for branding.
Twitter recommends a minimum image size of 400×400 pixels since it will be scaled down to 200×200 on the profile page and even smaller in the timeline.
- Click on the ‘Add a profile photo’
- Choose ‘Upload photo’
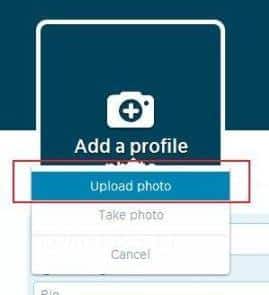
- Choose the photo or logo image of your store from your PC
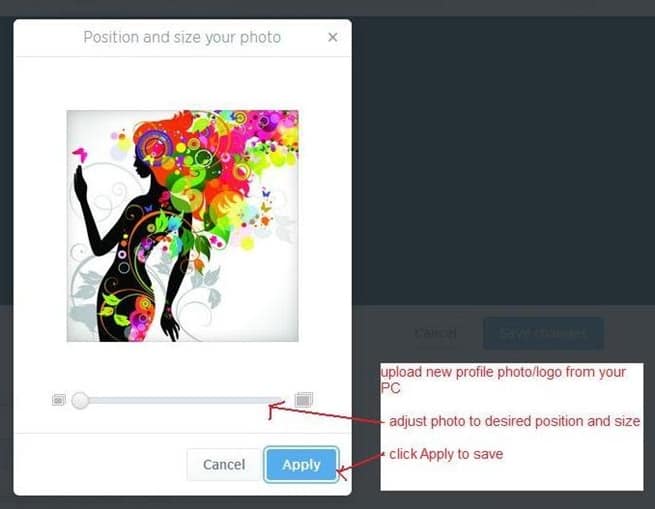
- Adjust the position and size of your profile photo
- Click ‘Apply’ once you’re done
Step 7: Add Your Header Photo
The header photo on your Twitter profile page is a great opportunity to showcase your products or store since it is bigger and the first thing that followers will notice.
Twitter recommends using 1500×500 pixels for the header. However, Twitter usually blows up the header photo on a bigger screen which may cause the image to pixelate.
Use a bigger photo about 3000×1000 pixels or use a higher DPI if you want to stick with what’s recommended.
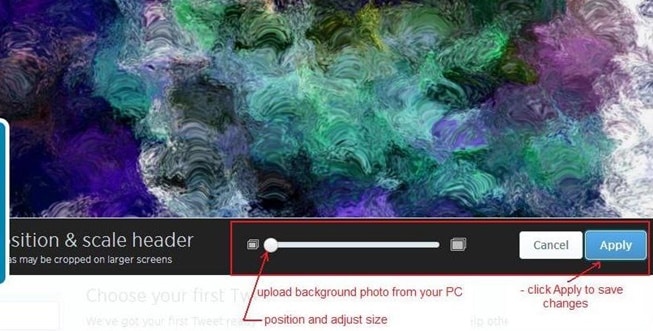
- Click ‘Add a header photo’

- Upload your store’s header photo from your PC
- Use the ‘photo adjustment’ if you want to update the current position and size of your header photo
- Click ‘Apply’ to save
Below is what your Twitter page will look like after uploading the profile and header photos.
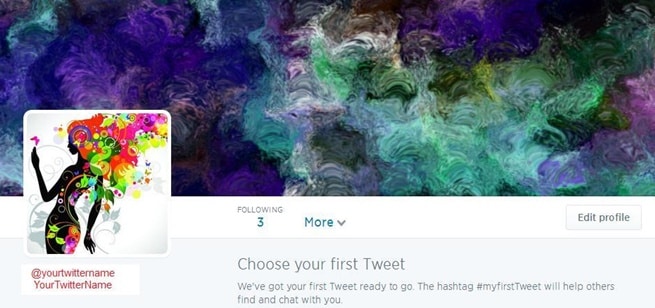
Further in this how-to guide, you will see some examples of Twitter accounts owned by different eCommerce stores.
Step 8: Update Your Profile
Update your Twitter profile since it’s not yet complete since you’ve only entered basic info.
- Click the ‘gear’ icon at the top right corner of your screen (in between the email and new tweet icons)
- Choose ‘settings’
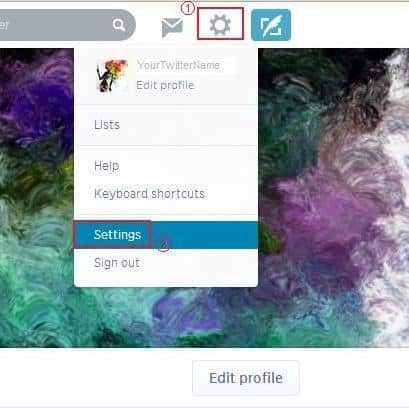
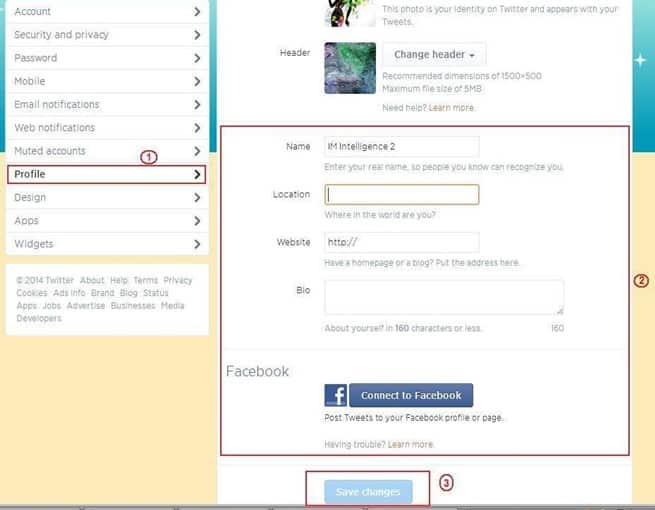
- Choose ‘Profile’ on the menu on the left to pull up the details page/form
- Fill in the necessary info on this page – location, website, bio, connect to Facebook (if applicable)
- You may also update your name on this page if you need to
- Click ‘Save changes’ once you’re done
Step 9: Send Your Very First Tweet
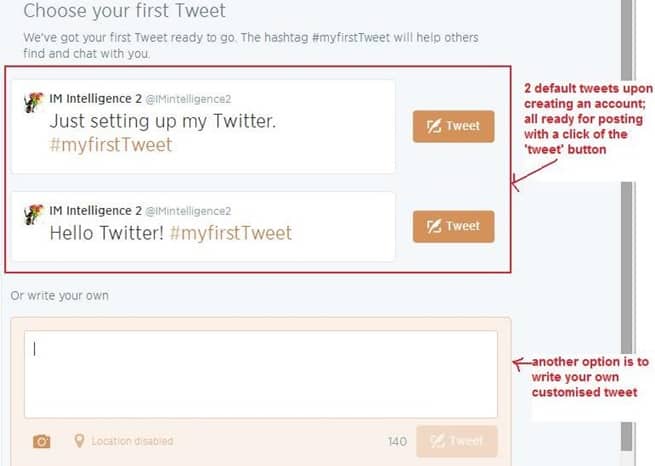
It’s quite simple and easy to send a tweet. Just remember that there’s a limit of 140 characters, so you need to be a bit of a wordsmith to ensure your message is concise.
You have two options:
Tweet your first message/s using the two default tweets already on your profile.
The second option is to write your own tweet using the blank Tweet box underneath the default tweets.
Step 10: Follow Other Twitter Users
Since your Twitter account is for your eCommerce store, you can only follow people you know (usually the first ones are in your email contacts) and people who are interested in your products or those who have similar/relevant interests.
So in order to follow other people who might be interested in what you’re selling, you need to find them first based on their interests.
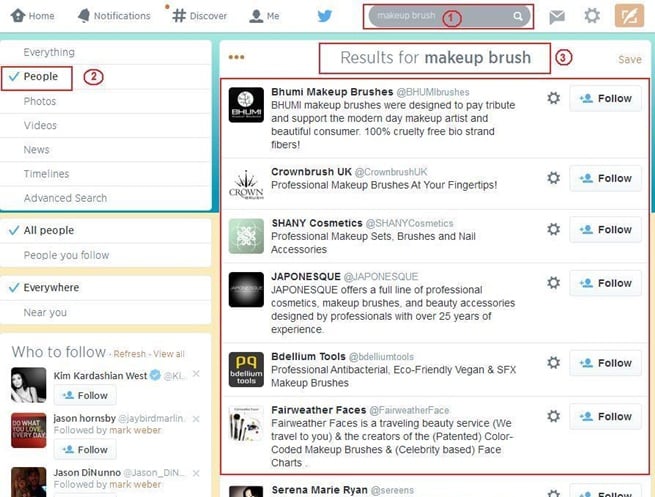
- Use the ‘search box’ at the menu bar atop your header
- Type in a word or phrase that pertains to a product you’re selling – e.g. makeup brush
- Click the search icon (magnifying lens)
- Filter results by clicking ‘People’ on the left-hand menu
- Check the results and see who’s the most relevant
- Follow those who are of interest to you based on relevance
Tips:
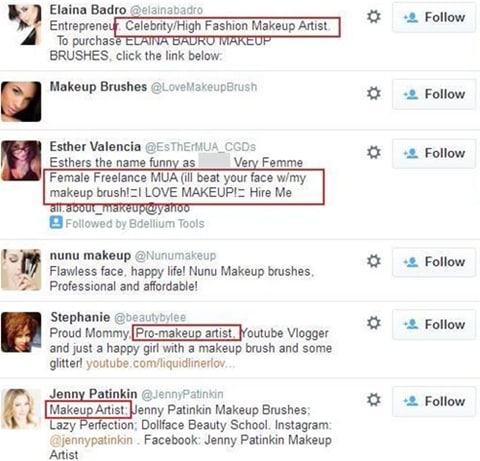
In our example, we searched for ‘makeup brushes’ and found a list of people who are obviously selling the same product. Follow them, but also look for people who are potential buyers such as makeup artists.
Below is a continuation of the list of people we’ve pulled up and it includes numerous makeup artists.
Learn From Others
Your Twitter account for your eCommerce store should be able to help you get more potential customers in the long run. But first you need to have a presence on this social media channel in order for people to find and follow you.
Aside from posting regular tweets, it is important that you’ve established a visually pleasing profile that also shows your brand. Your followers and people who are looking for similar products or stores will be able to associate your Twitter account and messages with your actual eCommerce store.
The use of product photo for headers and logo for profile photos is a common practice among these sellers. Also, you will see in some examples below that some tweets are not about just their products or offers.
Example 1: Bauble Bar
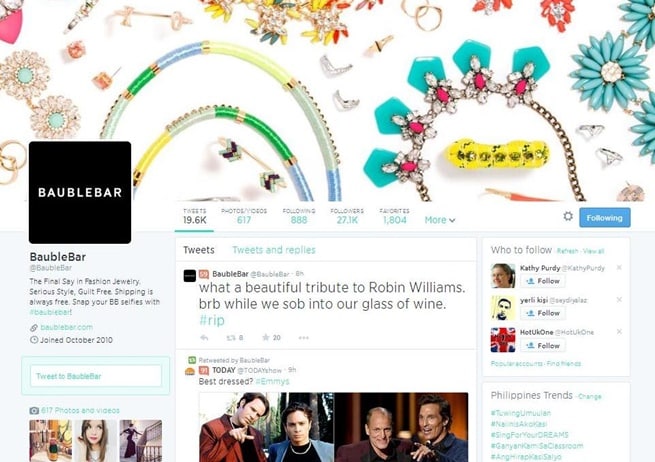
Bauble Bar is a fashion jewelry seller and it is easy to see this just by looking at their Twitter profile.
However, their tweets (as seen here) are irrelevant to what they’re selling. As much as possible, avoid or minimize such tweets.
Example 2: Dylan’s Candy Bar
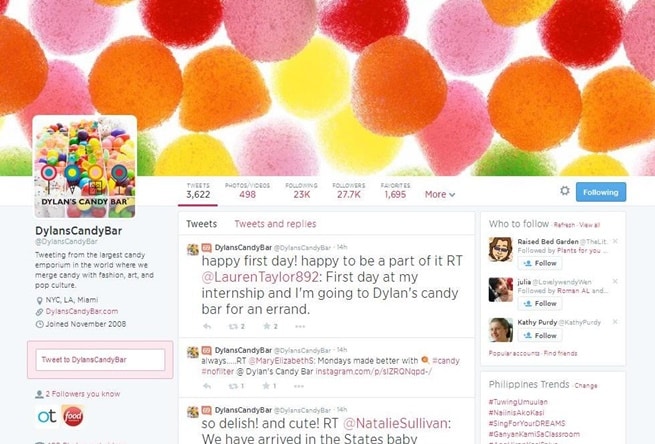
This New York based candy shop also sells online. They are quite active in tweeting and interacting with their followers, which are all good practices to follow.
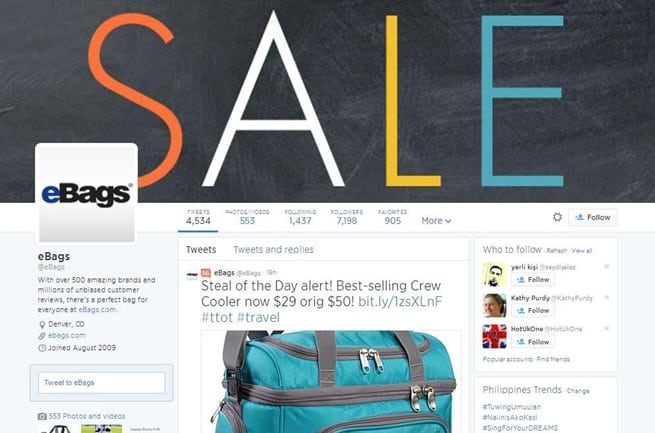
Example 3: eBags
When we took this screen shot of eBags’ Twitter account, this is what we found – a huge image of ‘SALE’ used as a header. It is timely because they indeed have a sale on this day.
You can capitalize your Twitter header by doing the same if you have special offers on a given day or a new product in your inventory.
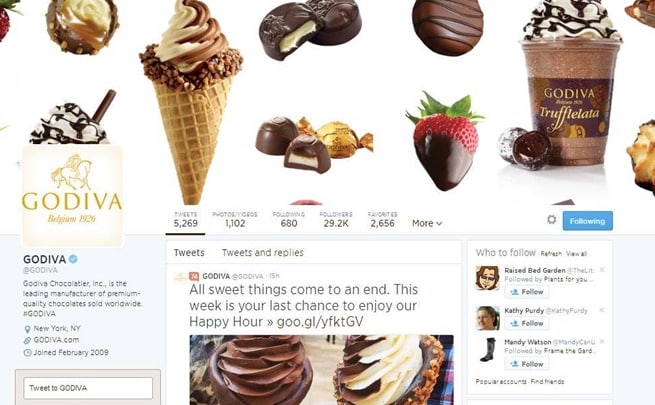
Example 4: Godiva
Nothing beats great photo tweets especially when it’s about food. And Godiva knows how to entice and make their followers’ mouths water.
Posting photo tweets is among the best practices because people love to see colorful pictures. Do this every time you want to promote a product via tweet.
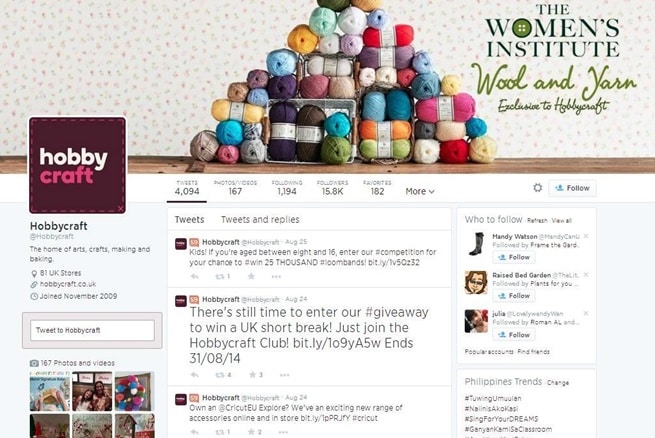
Example 5: Hobby Craft
Announcements such as contests are great to post on Twitter since you only need a few words to say so. Much better if you also post a photo tweet of the prizes.

Example 6: Magic Cabin
Staying relevant with a tweet can sometimes be a drag for other e-store owners. But this photo tweet from Magic Cabin – a store selling toys and crafts – is both thoughtful and relevant since they pertain to children.

Example 7: Park Seed
Double tweets can happen sometimes. But Park Seed seems to tweet the same message on purpose – one with a photo and the other without a photo.
As much as possible, avoid double tweets within the same hour to prevent redundancy. Your followers will see these on their feeds, so be cautious about it.
One way to avoid this is to have tweets prepared for the day or the week. Write them down on a notepad or Word doc and include a note if each tweet needs a photo or not.
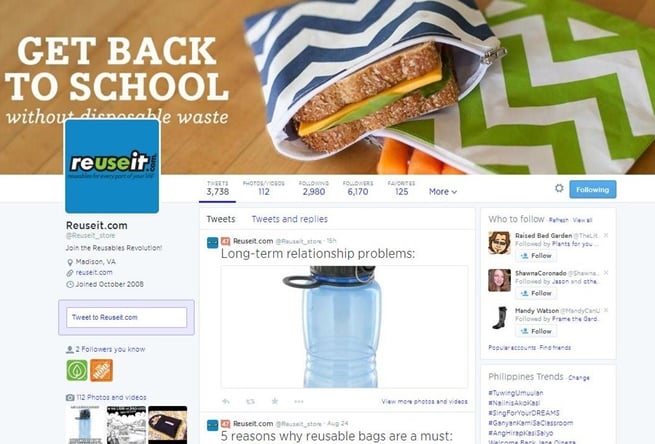
Example 8: Reuse It
Reuse It’s header is quite timely since schooldays are here in many parts of the globe. It’s a great way to capitalize on the time of year to offer a relevant product that’s also useful and environment-friendly.
It’s also great to see tweets that stick with their advocacy which is to reuse their products to prevent wastage.
Final Checklist
Setting up your Twitter account is easy if you follow the steps and examples on this guide. The earlier you set up, the more beneficial it is for your eCommerce store.
- Sign up directly using this Twitter link – http://twitter.com/signup.
- Enter your details on the sign up form to create your account.
- Make sure to check your email to confirm and activate your account.
- Follow the prompts on the Getting Started series.
- Add your profile and header photo.
- Update your profile by adding more info about your store.
- Send your very first tweet by using any of the default tweets or post your own tweet.
- Find and follow relevant people using the search box and (People) filtering.
Photo by freestocks.org

