The aim of this guide is to help you create a customized URL for your Facebook Fan page through step-by-step instructions so that you can come up with an easy to remember and appealing Facebook page.
Facebook provides an option for us to create a name-branded URL instead of using a long and ugly looking URL (www.facebook.com/pages/ourbusiness/012345678).
We can actually customize it to make a short and catchy URL (www.facebook.com/ourbusiness) that people can easily remember without even memorizing it.
That would be very useful when they spread your store’s page to other people.
Step 1: Know What URL To Use
It is best to always choose your store name as your Facebook Fan Page URL.
However, as there are a lot of other Facebook users, this may no longer be available at some point. It is also important to note that URL’s or Usernames as Facebook calls them are available on a first-come, first serve basis.
If someone has used a URL/username, you can no longer use it. If your store name is not available, you can choose one that is closely related to your store, what you sell or a short positive phrase that relates to what you do.
Example of the store “Pretty Flowers”. If /prettyflowers is no longer available. You can add words before or after your store name to make it unique. Something like:
- /myprettyflowers
- /soprettyflowers
- /moreprettyflowers
- /prettyflowershop
- /prettyflowersforyou
- /prettyflowerfans
- /prettyflowerscommunity
- /prettyflowershub
- /freshprettyflowers
Or you can play around the words or add significant numbers:
- /prettyflowers99
- /99prettyflowers
- /prettyflowers101
- /pretty.o.flowers
There are a lot of more ideas depending on your store. This is something that needs thinking and a bit of research.
Step 2: Follow The Guidelines On Choosing A Fan Page URL
When deciding on what page URL to use for your Fan page, consider the following guidelines:

- The URL can only include alphanumeric characters (A-Z, 0-9) or a period (.).
- Make sure that the URL you choose is something that can be used on a long term basis.
- Before you can select your own URL for your Fan page, you have to create a username for your Facebook profile first.
- Your page must have at least 25 fans to establish a URL. This is set to avoid name squatting.
- URL’s are not transferable and can only be changed ONCE, so make sure to think wisely on deciding what URL to use.
- Periods (“.”) and capitalization don’t count as a part of a username. For example, prettyflowers99, Pretty.Flowers99 and pretty.flowers.99 are all considered the same username.
- Facebook did not indicate any character limit on how long the Page URL should be, it should, however, be atleast 5 characters long. It would be best to create a short one.
- You can notify Facebook of an Intellectual Property infringement in case your trademarked name has already been taken and used by someone else.
- Keep this Facebook Help link in case you have specific questions or you need assistance.
Step 3: Change The URL Only If Needed
There may be some instances when you’ve decided to change the URL of your Fan Page. Only those with Admin accounts will be able to change the URL of the page.
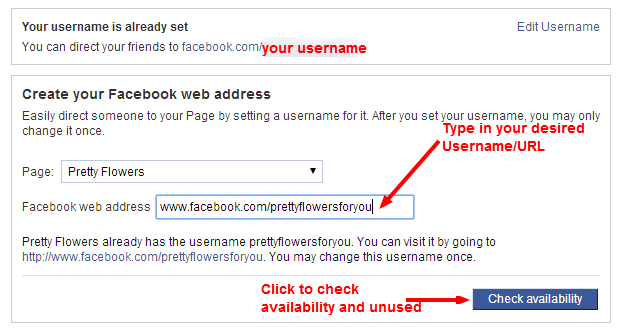
- If there’s a need to change the URL, you can go to https://www.facebook.com/username/
- Select your Page from the dropdown menu.
- Enter your new URL on the Facebook web address field.
- Click the Check availability button and click on Confirm when it’s available.
- If not, think of a new URL and try again.

Please do take note that you can only change the Page URL ONCE. So make sure you change it only when you need it and be wise on your decision.
Final Checklist
In order to create a customized URL for your store’s Facebook page, take note of the following:
- Conceptualize and know what URL to use.
- It is always best to use your store’s name as the URL, if it’s not available, try other closer ones.
- Follow Facebook’s guidelines on creating a customized URL.
- You can only change the URL once so be wise when changing it.
Photo by Freepik / CC BY

